Apple Releases macOS High Sierra With New Apple File System

Apple Releases macOS High Sierra With New Apple File System


Apple today released the newest version of its operating system for Macs, macOS High Sierra 10.13 available to the public. macOS High Sierra is a free download that’s available today for four Apple system platforms, including iOS, WatchOS, tvOS and macOS.

MacOS High Sierra brings new features and improvements include new Apple file system (APFS), Safari 11, photos, Photo upgrade, iCloud file sharing, and a lot of architectural improvements, etc.

System requirements

macos-high-sierra-wallpaper-hero-with-imac-pro-idownloadblog-splash

Apple says the system requirements for macOS High Sierra are all available for Mac which are launched in the mid-year or later in 2010, or the MacBook and iMac since end of the year of 2009. The No. of official version for macOS High Sierra is 17A365, which is a little bit difference with GM (17A3262). macOS High Sierra can be downloaded directly from the Mac App Store or through the Software Update function in the Mac App Store.

2d86f11fb96b6ef


A full list about the requirements for macOS High Sierra:
2009 and Later
– iMac (Late 2009)
– MacBook (Late 2009)

2010 and Later
– MacBook Air (Late 2010)
– MacBook Pro (Mid 2010)
– Mac mini (Mid 2010)
– Mac Pro (Mid 2010)

Key new features in macOS High Sierra

We’ve discussed the key new features in macOS High Sierra overall before the launch of official version, including Safari, Photo, APFS, Video, Metal 2, and more in these stories:
macOS High Sierra: New Features We Know (Part I)
macOS High Sierra: New Features We Know (Part II)

800x500bb-2

iBook Author

Following the arrival of the official version of the macOS High Sierra, Apple has updated the Mac iBook Author. It is reported that the new version introducing improvements to Photo and Video, while supporting wide-gamut image, making improvement in performance and stability.

About the new feature if iBook Author, Drag-and-drop feature to add images and video from Photo application through using media browser, while supports the gamut image, and making improvement in performance and stability.

iMovie

while iMovie App is officially upgraded, with support of Apple High Efficiency Video Coding (HEVC), and it also has been improved compatibility with YouTube meanwhile.

How to Install Windows 10 on Your Mac with Boot Camp

Install Windows on Your Mac with Boot Camp

macos-sierra-boot-camp-hero0

How you ever thought about installing a Windows operating system on your Mac computer? Can you image how it feels to run a Windows operating system above Mac OS X? Thus, today, we’d like to introduce a very simple and easy way to install a Windows operating system on Mac computer with Boot Camp, and you will use it in daily life, keep on reading now.

Mac vs. Windows. Windows vs. Mac, which will win for you to choose in case you’ve only got one computer? Why choose when you can get the best of both worlds by dual-booting? Here’s how to install Windows on your Mac using Boot Camp so you can jump back and forth between the two operating systems on the same computer.

We’ve got better help from Apple Support:

What You’ll Need

Before you begin, make sure you have everything you need:

  • An Intel-based Mac
  • A Microsoft Windows installation media or disk image (ISO) containing a 64-bit version of Microsoft Windows 8 or later
  • An Apple keyboard, mouse, or trackpad, or a USB keyboard and mouse
  • At least 55GB of free disk space on your startup drive
  • A blank 16GB or larger USB 2 flash drive

Install Windows 10 on Your Mac

1. Download the Windows 10 ISO disk image from Microsoft using this link. Choose the 64-bit version of Windows. You might need to create a disk image of it to work with Boot Camp. If your version of Windows came on a USB flash drive, you can download an ISO from Microsoft by clicking here.

2. Open Boot Camp Assistant. Launch Finder << Application then select the Boot Camp Assistant, if you can’t find it any more in the Application folder, please type its name in the search box at the top right corner, or you can hit CMD + Spacebar to search for “Boot Camp Assistant.” And you’ll find this in the Utilities folder.

bootcampassistant-670x3871

3. Click Continue at the Introduction screen.

bootcamp-continue-564x4002

4. Click Continue again at the Select Tasks screen.

bootcamp-continue2-570x4003
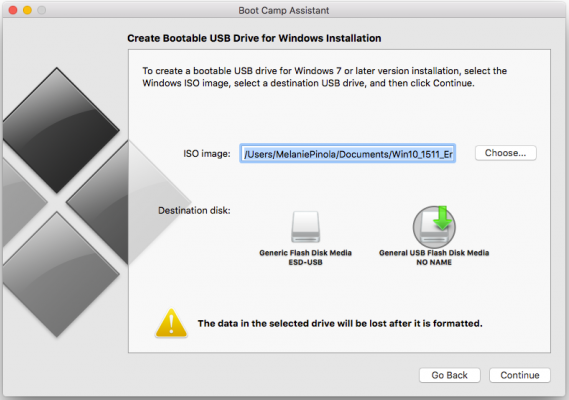
5. Choose the Windows ISO image and select the destination USB drive. Note that the USB drive will be reformatted, so make sure you have a copy of any of the files on it somewhere else before proceeding.

bootcamp-usb-569x4004

6. Click Continue and then Continue again. Your Mac will format the USB drive and create the Windows installation media.

7. Click Install to accept the partition size for each OS and confirm the installation.

bootcamp-partition-577x4005

8. Follow the prompts to finish installing Windows. The Mac will need to restart to complete the process.

After Windows is installed, use the Startup Disk preference pane in macOS or the Boot Camp system tray item in Windows to select your startup disk, and then restart your computer. So if you need to switch between macOS and Windows system you just need to restart the computer, or choose what you like at the begin of Boot.

Install Windows on Your Mac with Boot Camp

Now have the interest to install a Windows 10 operating system on your Mac and switch whenever you like?